
[Android] Apollo를 이용해 Graph QL API 통신3
이전글 보기
[Android] Apollo를 이용해 Graph QL API 통신2
마지막 예제를 진행하겠다.
이번엔 Graph QL에서 mutation작성하는것을 중점적으로 보겠다.
뮤테이션은 서버의 데이터를 변경하는데 사용된다. 여기에서사용되는 로그인 뮤테이션은 이메일 주소를 기반으로 세션을 생성한다.
뮤테이션 작성
백엔드에 로그인하기위해 먼저 샌드박스를 사용해 뮤테이션을 만들어보겠다.
로그인 뮤테이션
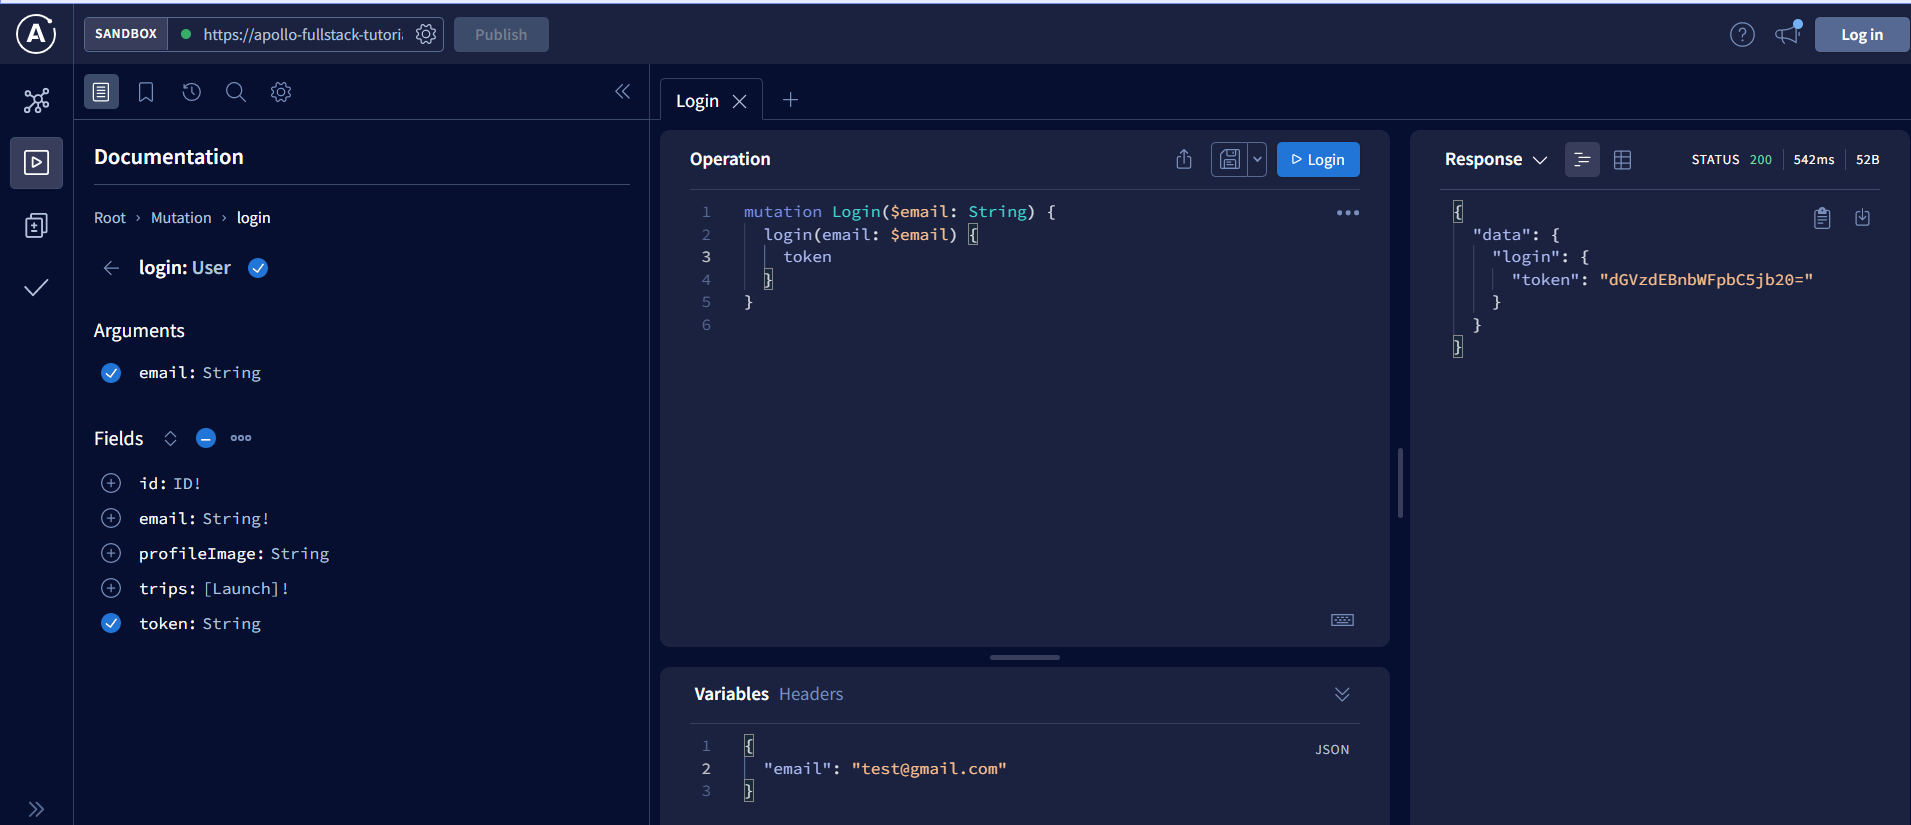
로그인 뮤테이션을 샌드박스에서 확인해본다.
이메일에맞춰 토큰이 잘 생성됨을 알 수 있다. 이제 해당 뮤테이션을 넣어주자
mutation Login($email: String!) {
    login(email: $email) {
        token
    }
}
우리는 항상 값을 전달하기를 원하기 때문에 email 유형 끝에 ‘!’를 추가하여 변수가 nullable이 아닌 것으로 표시한다.
이제 프로젝트를 빌드하면 LoginMutation이 자동으로 생성된다.
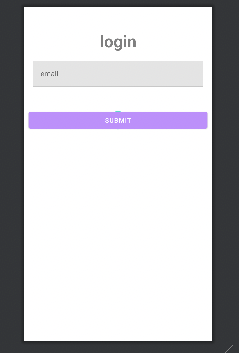
로그인에 필요한 뮤테이션이 만들어졌으니 이제 로그인 화면과 연결해준다.
먼저 뷰모델에 로그인 뮤테이션 함수를 만들어준다.
- MainViewModel
class MainViewModel : ViewModel() {
    var loginMutationToken = MutableLiveData<ApolloResponse<LoginMutation.Data>>()
    var errorLiveData = MutableLiveData<ApolloException>()

    fun loginMutation(email:String,context: Context) = GlobalScope.launch{
        try {
            loginMutationToken.postValue(Apollo.apolloClient(context).mutation(LoginMutation(email = email)).execute())
        }catch (e: ApolloException){
            errorLiveData.postValue(e)
            Log.e("LoginMutation", "Failure", e)
            return@launch
        }
    }

}
- login_fragment.xml
<?xml version="1.0" encoding="utf-8"?>
<androidx.constraintlayout.widget.ConstraintLayout
    xmlns:android="http://schemas.android.com/apk/res/android"
    android:layout_width="match_parent"
    android:layout_height="match_parent"
    xmlns:app="http://schemas.android.com/apk/res-auto"
    xmlns:tools="http://schemas.android.com/tools">

    <TextView
        android:layout_width="0dp"
        android:layout_height="wrap_content"
        android:text="login"
        android:layout_margin="50dp"
        app:layout_constraintStart_toStartOf="parent"
        app:layout_constraintEnd_toEndOf="parent"
        app:layout_constraintTop_toTopOf="parent"
        android:gravity="center"
        android:textStyle="bold"
        android:id="@+id/login"
        android:textSize="36sp"/>

    <com.google.android.material.textfield.TextInputLayout
        android:layout_width="0dp"
        android:id="@+id/email_layout"
        android:layout_height="wrap_content"
        app:layout_constraintTop_toBottomOf="@+id/login"
        app:layout_constraintStart_toStartOf="parent"
        app:layout_constraintEnd_toEndOf="parent"
        android:layout_margin="20dp"
        android:hint="email"
        tools:text="test@test.com">

        <com.google.android.material.textfield.TextInputEditText
            android:id="@+id/email"
            android:layout_width="match_parent"
            android:layout_height="wrap_content"/>
    </com.google.android.material.textfield.TextInputLayout>

    <Button
        android:id="@+id/submit"
        android:layout_width="0dp"
        android:layout_height="wrap_content"
        android:backgroundTint="@color/purple_200"
        app:layout_constraintTop_toBottomOf="@id/email_layout"
        app:layout_constraintStart_toStartOf="parent"
        app:layout_constraintEnd_toEndOf="parent"
        android:text="submit"
        android:textColor="@android:color/white"
        android:layout_marginTop="50dp"
        android:layout_marginStart="10dp"
        android:layout_marginEnd="10dp"/>
    <ProgressBar
        android:layout_width="wrap_content"
        android:layout_height="wrap_content"
        android:id="@+id/submit_progress_bar"
        app:layout_constraintStart_toStartOf="@+id/submit"
        app:layout_constraintEnd_toEndOf="@+id/submit"
        app:layout_constraintTop_toTopOf="@+id/submit"
        app:layout_constraintBottom_toBottomOf="@+id/submit"/>
</androidx.constraintlayout.widget.ConstraintLayout>
- LoginFragment
class LoginFragment : Fragment() {
    private lateinit var binding: LoginFragmentBinding
    private val viewModel : MainViewModel by activityViewModels()
    override fun onCreateView(
        inflater: LayoutInflater,
        container: ViewGroup?,
        savedInstanceState: Bundle?
    ): View {
        binding = LoginFragmentBinding.inflate(inflater, container, false)
        return binding.root
    }

    override fun onViewCreated(view: View, savedInstanceState: Bundle?) {
        super.onViewCreated(view, savedInstanceState)

        binding.submitProgressBar.visibility = View.GONE
        binding.submit.setOnClickListener {
            val email = binding.email.text.toString()
            if (!Patterns.EMAIL_ADDRESS.matcher(email).matches()) {
                binding.emailLayout.error = "Invalid email"
                return@setOnClickListener
            }
            binding.submitProgressBar.visibility = View.VISIBLE
            binding.submit.visibility = View.GONE
            viewModel.loginMutation(email,requireContext())
        }
        viewModelObserver()
    }

    private fun viewModelObserver(){
        viewModel.loginMutationToken.observe(viewLifecycleOwner){ response ->
            val token = response?.data?.login?.token
            if (token == null || response.hasErrors()){
                binding.submitProgressBar.visibility = View.GONE
                binding.submit.visibility = View.VISIBLE
                return@observe
            }
            User.setToken(requireContext(), token)
            findNavController().popBackStack()
        }
    }
}
서밋 버튼을 누르면 이메일 형식을 확인한뒤 서버에 요청한다. 그럼 라이브데이터로 토큰값이 오게된다.
그 토큰을 User.setToken 통해 앱에 저장한뒤 다시 전 화면으로 돌아간다.
작업 인증
이번에는 서버에 인증받는부분을 추가해보겠다. Apollo가 OkHttp를 이용해 HTTP요청을 처리하므로 OkHttp 인터셉터를 사용하여 GraphQL 요청에 헤더를 추가한다.
인터셉터 추가
먼저 Apollo 클래스에 AuthorizationInterceptor를 추가한다.
object Apollo {
    //생략

    private class AuthorizationInterceptor(val context: Context): Interceptor {
        override fun intercept(chain: Interceptor.Chain): Response {
            val request = chain.request().newBuilder()
                .addHeader("Authorization", User.getToken(context) ?: "")
                .build()
            return chain.proceed(request)
        }
    }
}
이 인터셉터는 "Authorization: $token"모든 요청에 HTTP 헤더를 추가한다.
인터셉터 연결
이 인터셉터를 사용할 사용자 지정 OkHttpClient를 생성하여 ApolloClient에 전달한다.
object Apollo {
    fun apolloClient(context: Context):ApolloClient{
        val okHttpClient = OkHttpClient.Builder()
            .addInterceptor(AuthorizationInterceptor(context))
            .build()

        return ApolloClient.Builder()
            .serverUrl("https://apollo-fullstack-tutorial.herokuapp.com/graphql")
            .okHttpClient(okHttpClient)
            .build()
    }

    private class AuthorizationInterceptor(val context: Context): Interceptor {
        override fun intercept(chain: Interceptor.Chain): Response {
            val request = chain.request().newBuilder()
                .addHeader("Authorization", User.getToken(context) ?: "")
                .build()
            return chain.proceed(request)
        }
    }
}
이제 아폴로 클라이언트를 호출할때 클라이언트가 필요하기때문에 컨텍스트 객체를 파라미터를 지정해준다.
class MainViewModel : ViewModel() {
    var launchListQueryData = MutableLiveData<ApolloResponse<LaunchListQuery.Data>>()
    var launchDetailQueryData = MutableLiveData<ApolloResponse<LaunchDetailsQuery.Data>>()
    var loginMutationToken = MutableLiveData<ApolloResponse<LoginMutation.Data>>()

    var errorLiveData = MutableLiveData<ApolloException>()

    fun getLaunchListQuery(cursor:String?,context: Context) = GlobalScope.launch{
        try {
            launchListQueryData.postValue(Apollo.apolloClient(context).query(LaunchListQuery(Optional.Present(cursor))).execute())
        }catch (e: ApolloException){
            errorLiveData.postValue(e)
            Log.e("LaunchList", "Failure", e)
            return@launch
        }
    }

    fun getLaunchDetailQuery(id:String,context: Context) = GlobalScope.launch{
        try {
            launchDetailQueryData.postValue(Apollo.apolloClient(context).query(LaunchDetailsQuery(id)).execute())
        }catch (e: ApolloException){
            errorLiveData.postValue(e)
            Log.e("LaunchDetail", "Failure", e)
            return@launch
        }
    }

    fun loginMutation(email:String,context: Context) = GlobalScope.launch{
        try {
            loginMutationToken.postValue(Apollo.apolloClient(context).mutation(LoginMutation(email = email)).execute())
        }catch (e: ApolloException){
            errorLiveData.postValue(e)
            Log.e("LoginMutation", "Failure", e)
            return@launch
        }
    }
}
여행 예약 및 취소 뮤테이션 추가
해당 기능을 추가하기 위해 먼저 BookTrip, CancelTrip 뮤테이션을 추가한다.
- BookTrip
mutation BookTrip($id:ID!) {
  bookTrips(launchIds: [$id]) {
    success
    message
    launches {
      id
    }
  }
}
- CancelTrip
mutation CancelTrip($id:ID!) {
  cancelTrip(launchId: $id) {
    success
    message
    launches {
      id
    }
  }
}
예약, 예약취소 UI추가
이제 해당 뮤테이션을 이용해 화면에 표출해본다.
- MainViewModel
class MainViewModel : ViewModel() {
    var launchListQueryData = MutableLiveData<ApolloResponse<LaunchListQuery.Data>>()
    var launchDetailQueryData = MutableLiveData<ApolloResponse<LaunchDetailsQuery.Data>>()
    var loginMutationToken = MutableLiveData<ApolloResponse<LoginMutation.Data>>()
    var bookTripMutationData = MutableLiveData<ApolloResponse<BookTripMutation.Data>>()
    var cancelTripMutationData = MutableLiveData<ApolloResponse<CancelTripMutation.Data>>()

    var errorLiveData = MutableLiveData<ApolloException>()
    var mutationErrorLiveData = MutableLiveData<ApolloException>()

    fun getLaunchListQuery(cursor:String?,context: Context) = GlobalScope.launch{
        try {
            launchListQueryData.postValue(Apollo.apolloClient(context).query(LaunchListQuery(Optional.Present(cursor))).execute())
        }catch (e: ApolloException){
            errorLiveData.postValue(e)
            Log.e("LaunchList", "Failure", e)
            return@launch
        }
    }

    fun getLaunchDetailQuery(id:String,context: Context) = GlobalScope.launch{
        try {
            launchDetailQueryData.postValue(Apollo.apolloClient(context).query(LaunchDetailsQuery(id)).execute())
        }catch (e: ApolloException){
            errorLiveData.postValue(e)
            Log.e("LaunchDetail", "Failure", e)
            return@launch
        }
    }

    fun loginMutation(email:String,context: Context) = GlobalScope.launch{
        try {
            loginMutationToken.postValue(Apollo.apolloClient(context).mutation(LoginMutation(email = email)).execute())
        }catch (e: ApolloException){
            errorLiveData.postValue(e)
            Log.e("LoginMutation", "Failure", e)
            return@launch
        }
    }

    fun bookTripMutation(id : String, context: Context) = GlobalScope.launch{
        try {
            bookTripMutationData.postValue(Apollo.apolloClient(context).mutation(BookTripMutation(id = id)).execute())
        }catch (e : ApolloException){
            mutationErrorLiveData.postValue(e)
            Log.e("bookTripMutation", "Failure", e)
            return@launch
        }
    }

    fun cancelTripMutation(id : String, context: Context) = GlobalScope.launch{
        try {
            cancelTripMutationData.postValue(Apollo.apolloClient(context).mutation(CancelTripMutation(id = id)).execute())
        }catch (e : ApolloException){
            mutationErrorLiveData.postValue(e)
            Log.e("cancelTripMutation", "Failure", e)
            return@launch
        }
    }
}
- LaunchDetailsFragment
class LaunchDetailsFragment : Fragment() {
    private lateinit var binding: LaunchDetailsFragmentBinding
    private val viewModel : MainViewModel by activityViewModels()
    private val args: LaunchDetailsFragmentArgs by navArgs()

    override fun onCreateView(
        inflater: LayoutInflater,
        container: ViewGroup?,
        savedInstanceState: Bundle?
    ): View? {
        binding = LaunchDetailsFragmentBinding.inflate(inflater)
        return binding.root
    }

    override fun onViewCreated(view: View, savedInstanceState: Bundle?) {
        super.onViewCreated(view, savedInstanceState)
        viewModelObserver()

        lifecycleScope.launchWhenResumed {
            binding.bookButton.visibility = View.GONE
            binding.bookProgressBar.visibility = View.GONE
            binding.progressBar.visibility = View.VISIBLE
            binding.error.visibility = View.GONE

            viewModel.getLaunchDetailQuery(args.launchId,requireContext())
        }
    }

    private fun viewModelObserver(){
        viewModel.launchDetailQueryData.observe(viewLifecycleOwner){ response ->
            binding.progressBar.visibility = View.GONE
            if (response.data?.launch == null || response.hasErrors()){
                binding.error.text = response.errors?.get(0)?.message
                binding.error.visibility = View.VISIBLE
            }else{
                Glide.with(requireContext()).load(response.data!!.launch?.mission?.missionPatch).into(binding.missionPatch)
                binding.site.text = response.data!!.launch?.site
                binding.missionName.text = response.data!!.launch?.mission?.name
                val rocket = response.data!!.launch?.rocket
                binding.rocketName.text = "🚀 ${rocket?.name} ${rocket?.type}"
                configureButton(response.data!!.launch!!.isBooked)
            }
        }
        viewModel.errorLiveData.observe(viewLifecycleOwner){
            binding.progressBar.visibility = View.GONE
            binding.error.text = "Oh no... A protocol error happened"
            binding.error.visibility = View.VISIBLE
        }
    }
    private fun configureButton(isBooked: Boolean) {
        binding.bookButton.visibility = View.VISIBLE
        binding.bookProgressBar.visibility = View.GONE

        binding.bookButton.text = if (isBooked) {
            "Cancel"
        } else {
            "Book Now"
        }

        binding.bookButton.setOnClickListener {
            if (User.getToken(requireContext()) == null) {
                findNavController().navigate(
                    R.id.open_login
                )
                return@setOnClickListener
            }

            binding.bookButton.visibility = View.INVISIBLE
            binding.bookProgressBar.visibility = View.VISIBLE

            if (isBooked){
                viewModel.cancelTripMutation(id = args.launchId, context = requireContext())
            }else{
                viewModel.bookTripMutation(id = args.launchId, context = requireContext())
            }

            viewModel.bookTripMutationData.observe(viewLifecycleOwner){ response ->
                if (response.hasErrors()){
                    configureButton(isBooked)
                    return@observe
                }
                configureButton(!isBooked)

            }
            viewModel.cancelTripMutationData.observe(viewLifecycleOwner){ response ->
                if (response.hasErrors()){
                    configureButton(isBooked)
                    return@observe
                }
                configureButton(!isBooked)
            }
            viewModel.mutationErrorLiveData.observe(viewLifecycleOwner){
                configureButton(isBooked)
            }
        }
    }
}
로그인이끝나면 상세화면으로 돌아간다.
상세화면에서 예약버튼을 누르면 사용자 토큰을 확인한 후 예약되었는지 아니면 예약 취소했는지를 서버에 전송한후 UI를 변경한다.
구독 사용하기
GraphQL의 구독 기능을 이용해 누군가 예약을 할때마다 알림을 받을 수 있도록 기능을 추가하겠다.
구독을 통해 서버에서 이벤트가 발생할 때마다 실시간으로 알림을 받을 수 있다.
구독 추가
먼저 구독을 작성한다. 샌드박스를 보면 어떤형식으로 이루어져있는지 알 수 있다.
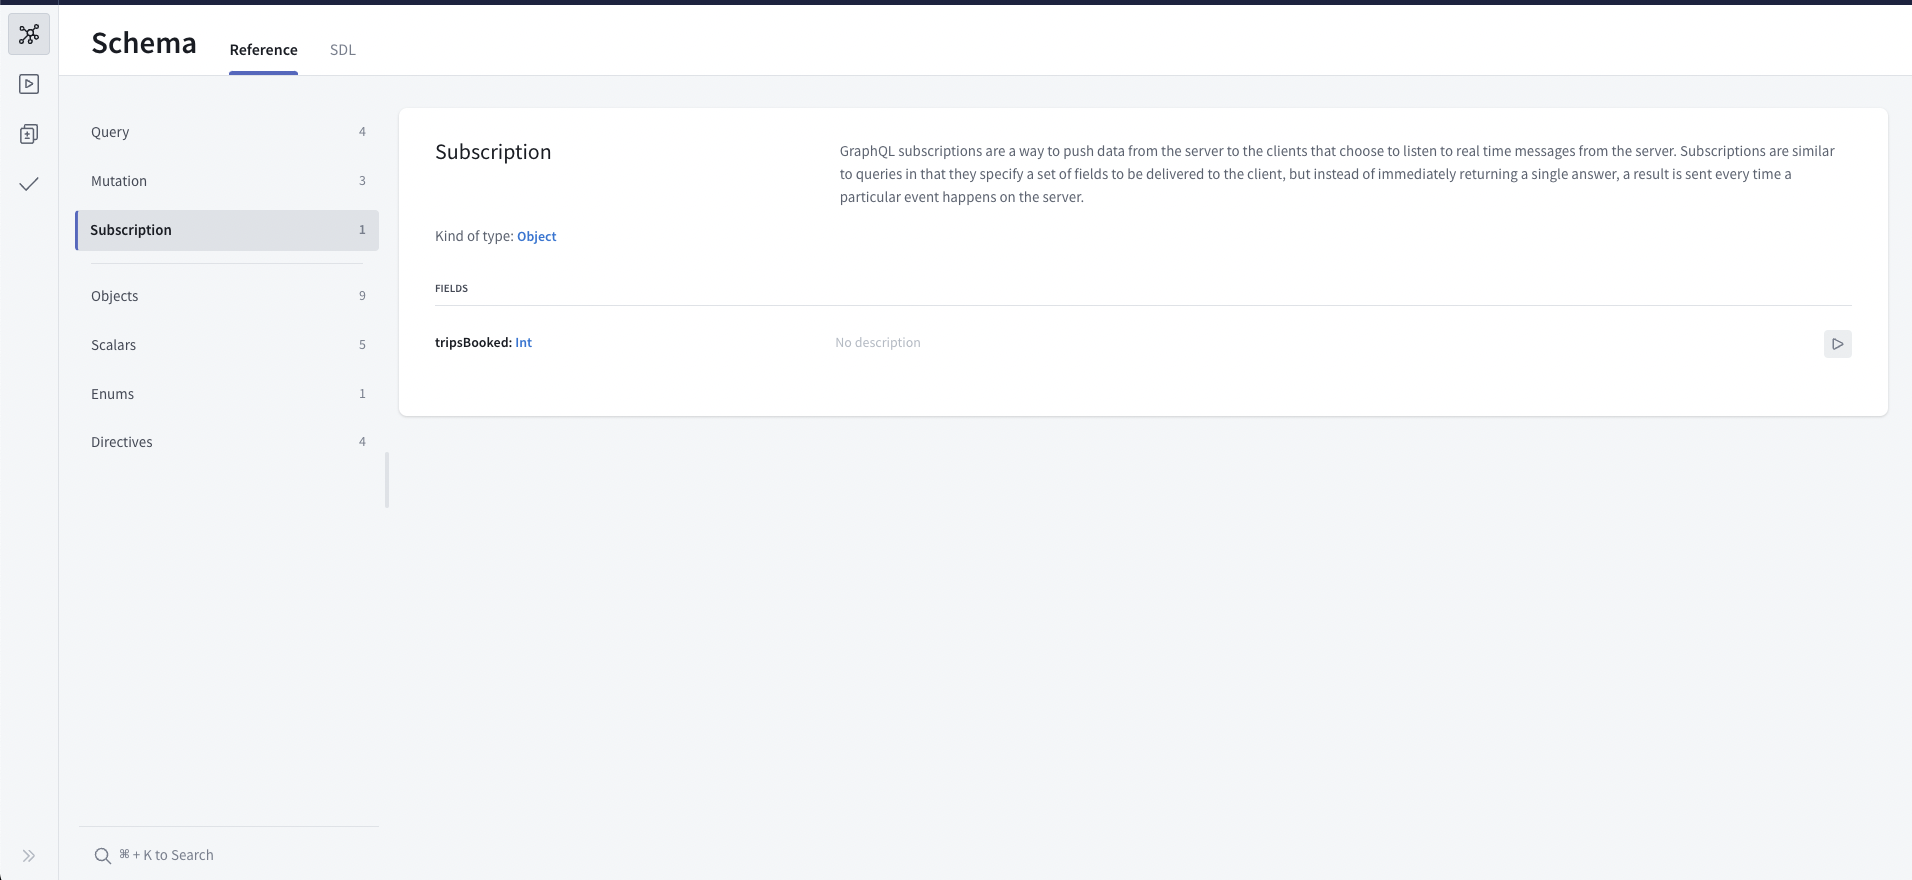
구독중이면 다음과 같이 리스닝 표시가뜬다.
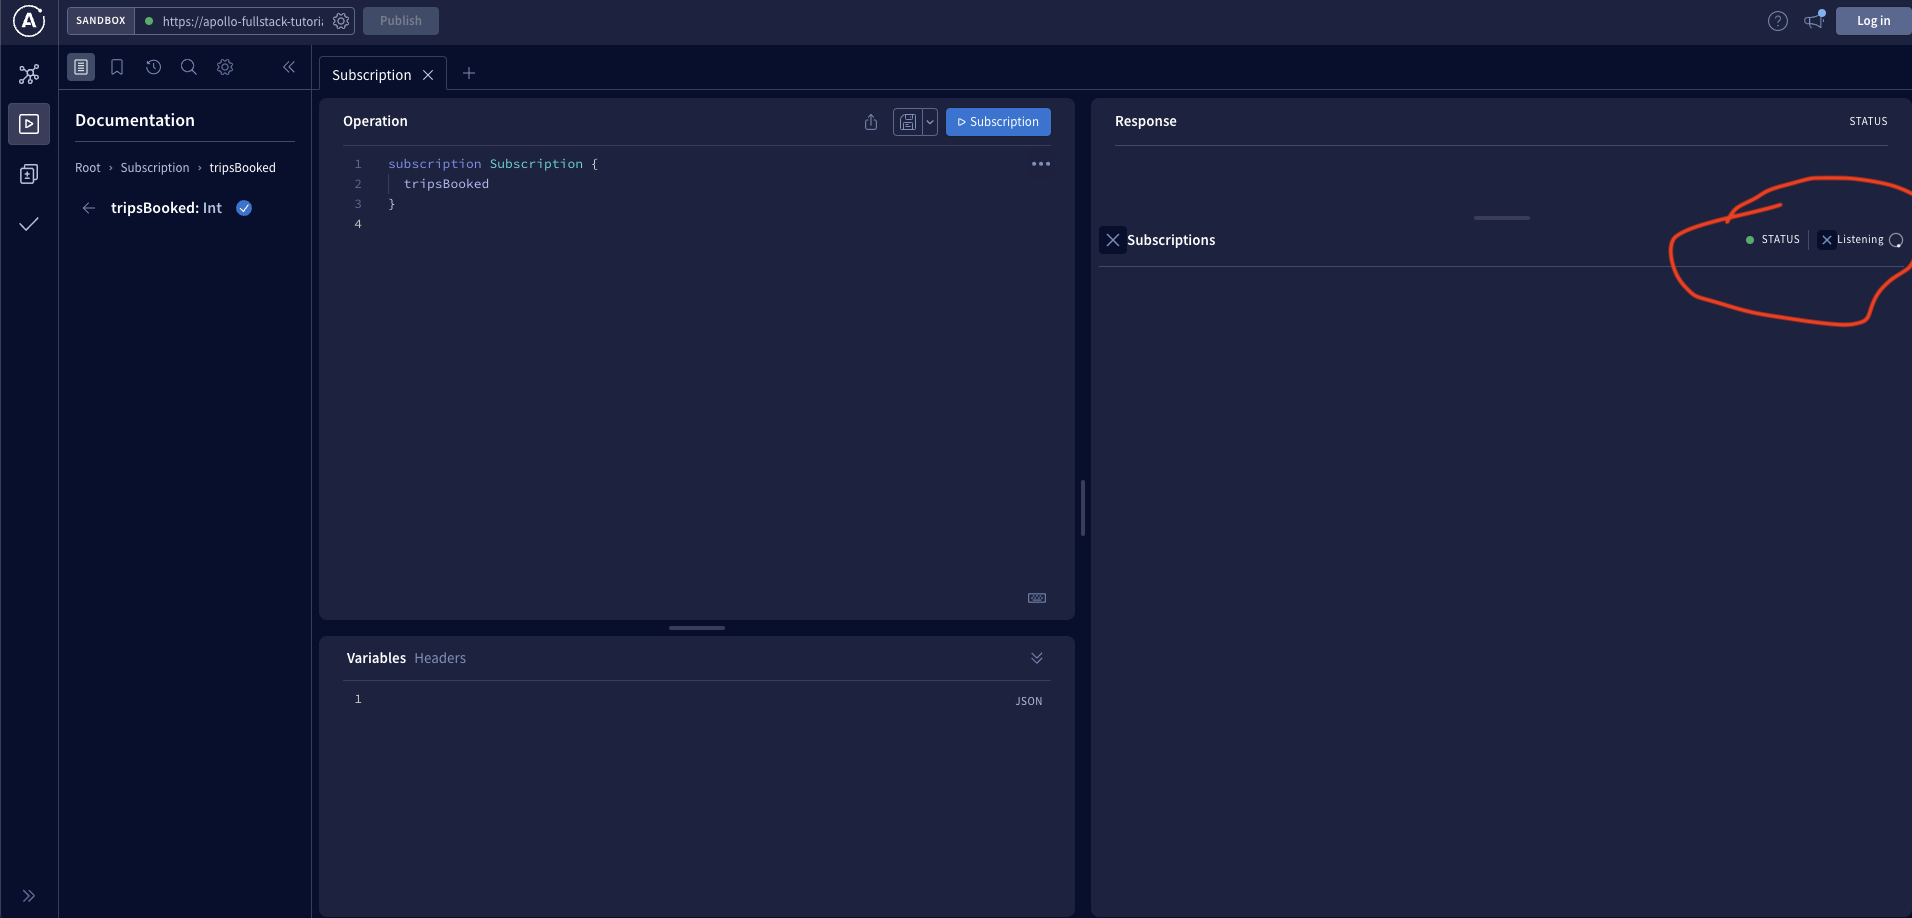
이벤트가 발생하면 데이터가 들어온다.
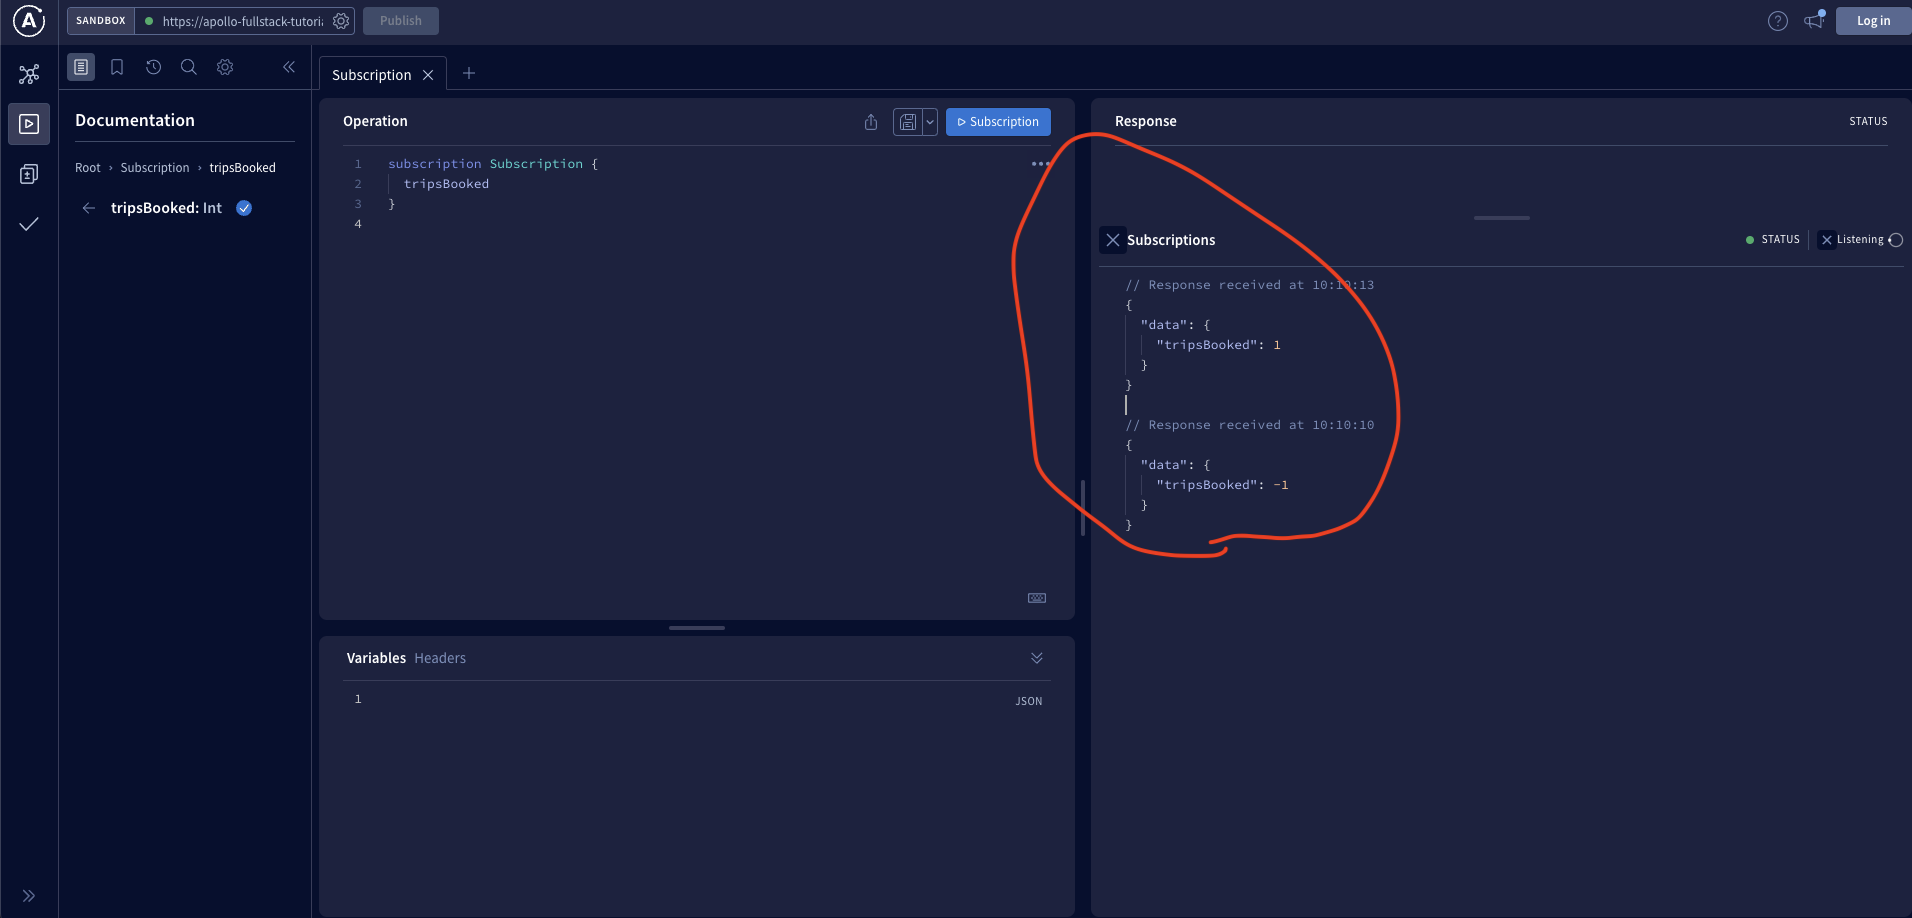
정상동작 하는것을 확인했으니 이제 코드에 추가한다.
subscription TripsBooked {
    tripsBooked
}
구독을위한 ApolloClient 구성
object Apollo {
    fun apolloClient(context: Context):ApolloClient{
        val okHttpClient = OkHttpClient.Builder()
            .addInterceptor(AuthorizationInterceptor(context))
            .build()

        return ApolloClient.Builder()
            .serverUrl("https://apollo-fullstack-tutorial.herokuapp.com/graphql")
            .webSocketServerUrl("wss://apollo-fullstack-tutorial.herokuapp.com/graphql")
            .okHttpClient(okHttpClient)
            .build()
    }

    private class AuthorizationInterceptor(val context: Context): Interceptor {
        override fun intercept(chain: Interceptor.Chain): Response {
            val request = chain.request().newBuilder()
                .addHeader("Authorization", User.getToken(context) ?: "")
                .build()
            return chain.proceed(request)
        }
    }
}
Apollo.kt에서 ApolloClient의 webSocketServerUrl을 구성한다.
wss://는 WebSocket용 프로토콜이다.
구독 이벤트 UI추가
MainActivity에서 구독을 등록하고 Coroutine Flows를 사용하여 이벤트 듣기를 시작한다. 그리고 데이터가 들어오면 스낵바를 사용하여 화면 하단의 작은 메시지를 표시한다.
class MainActivity : AppCompatActivity() {
    private val binding by lazy {
        ActivityMainBinding.inflate(layoutInflater)
    }

    @OptIn(InternalCoroutinesApi::class)
    override fun onCreate(savedInstanceState: Bundle?) {
        super.onCreate(savedInstanceState)
        setContentView(binding.root)

        lifecycleScope.launch {
            Apollo.apolloClient(this@MainActivity).subscription(TripsBookedSubscription()).toFlow()
                .retryWhen { _, attempt ->
                    delay(attempt * 1000)
                    true
                }
                .collect {
                    val text = when (val trips = it.data?.tripsBooked) {
                        null -> getString(R.string.subscriptionError)
                        -1 -> getString(R.string.tripCancelled)
                        else -> getString(R.string.tripBooked, trips)
                    }
                    Snackbar.make(
                        findViewById(R.id.main_frame_layout),
                        text,
                        Snackbar.LENGTH_LONG
                    ).show()
                }
        }
    }
}
쿼리 및 뮤테이션과 마찬가지로 연결이 끊기거나 다른 프로토콜 오류가 발생하면 구독에서 오류가 발생한다. 이러한 상황에 대처하려면 Flow.retry를 사용해야한다.
apolloClient(this@MainActivity).subscription(TripsBookedSubscription()).toFlow()
        .retryWhen { _, attempt ->
            delay(attempt * 1000)
            true
        }
        .collect {
            // ...
                }
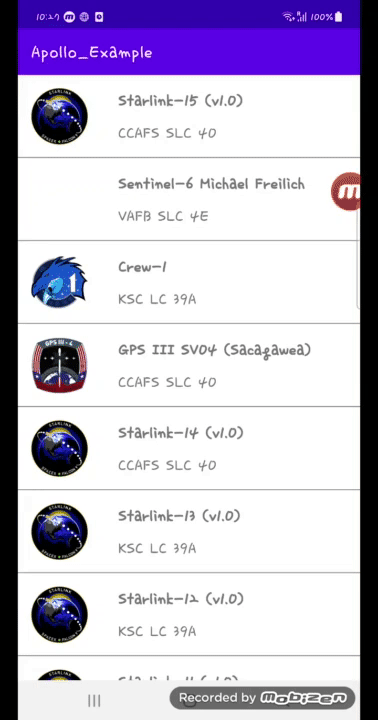
실행시키면 다음과 같이 나온다.
전체 코드는 아래 링크에서 볼 수 있다.
https://github.com/cellodove/Apollo_Example3
아폴로는 처음설정이 오래걸리지 세팅을 하고난뒤에는 쿼리, 뮤테이션, 구독만 가져와쓰면된다. 그마저도 서버에 정의된것을 복사에 넣으면되니 익숙해지면 편하게 사용할 수 있다.
이것으로 아폴로 예제 프로젝트를 마치겠다.
참조
https://www.apollographql.com/docs/kotlin/tutorial/10-authenticate-your-queries