
[Android] Apollo를 이용해 Graph QL API 통신2

이전글 보기
[Android] Apollo를 이용해 Graph QL API 통신1
계속해서 예제를 진행하겠다.
이번에는 더 많은 데이터를 가지고오고 페이징처리를 추가하겠다. 쿼리를 수정하거나 변수를 추가하는것을 중점적으로 보자
페이징 처리
LaunchList 쿼리 수정
먼저 튜토리얼에따라 쿼리로 가지고왔던 이미지(missionPatch)를 작은이미지로 가져오고(큰 이미지로 RecyclerView를 로드하면 성능에 영향을 줄 수 있으므로) 추가 데이터를 가져오도록 쿼리를 수정하겠다.
1편에서 말했듯이 graph ql은 클라이언트에서 원하는데이터를 가져올수있다.
그래서 이미지데이터와 추가 데이터를 위해
query LaunchList {
    launches {
        cursor
        hasMore
        launches {
            id
            site
            mission {
                name
                missionPatch
            }
        }
    }
}
이 쿼리를
query Launches($cursor: String) {
  launches(after : $cursor) {
    cursor
    hasMore
    launches {
      id
      site
      mission {
        name
        missionPatch(size: SMALL)
      }
    }
  }
}
다음과 같이 바꿔준다.
GraphQL에서 변수에는 다음과 같이 달러 기호가 접두사로 붙는다.
missionPatch(size: SMALL) 를 커서와 마찬가지로 변수로 지정하여 이미지의 크기를 크거나 작게 사용자가 설정할 수 있다.
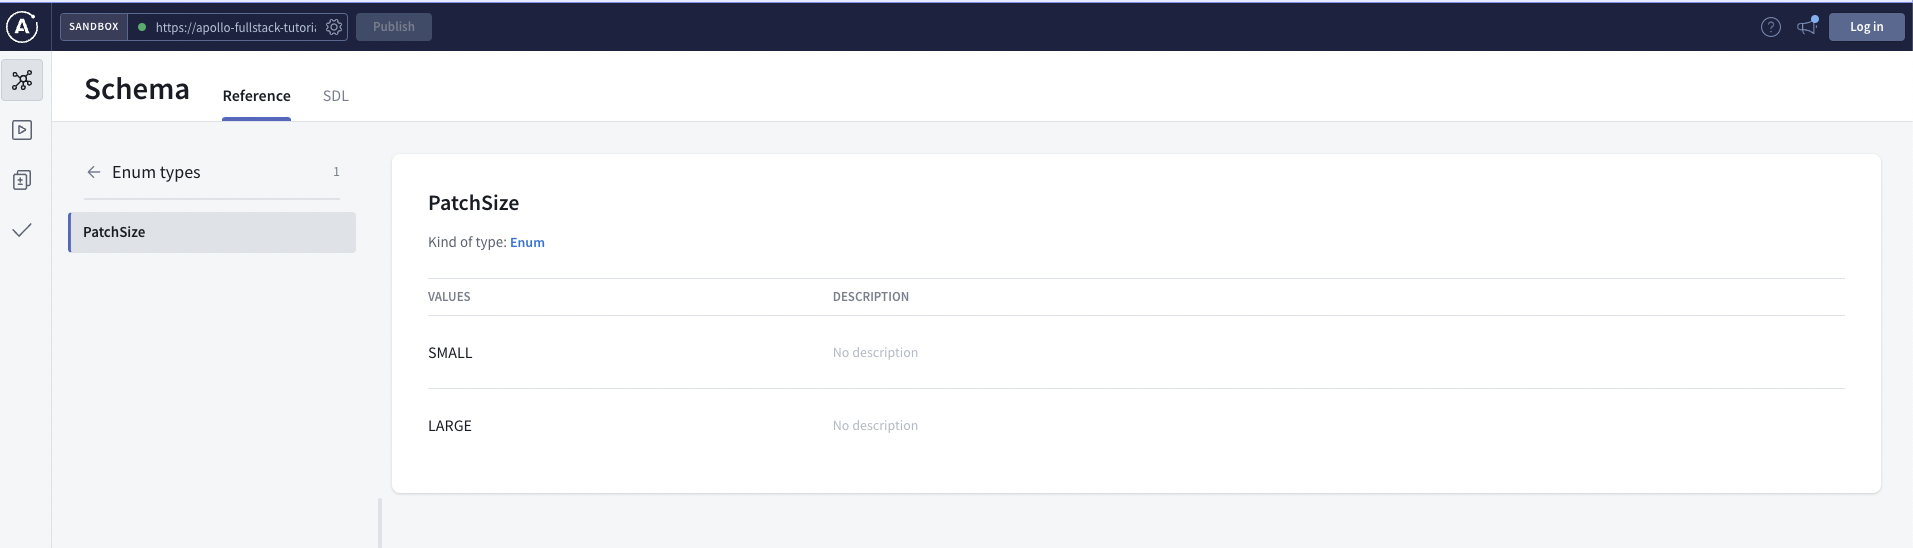
하지만 우리는 계속 작은 이미지만 사용할거기에 쿼리에 직접적으로 입력했다.
graph ql 샌드박스에서 동작하는지 확인해본다.
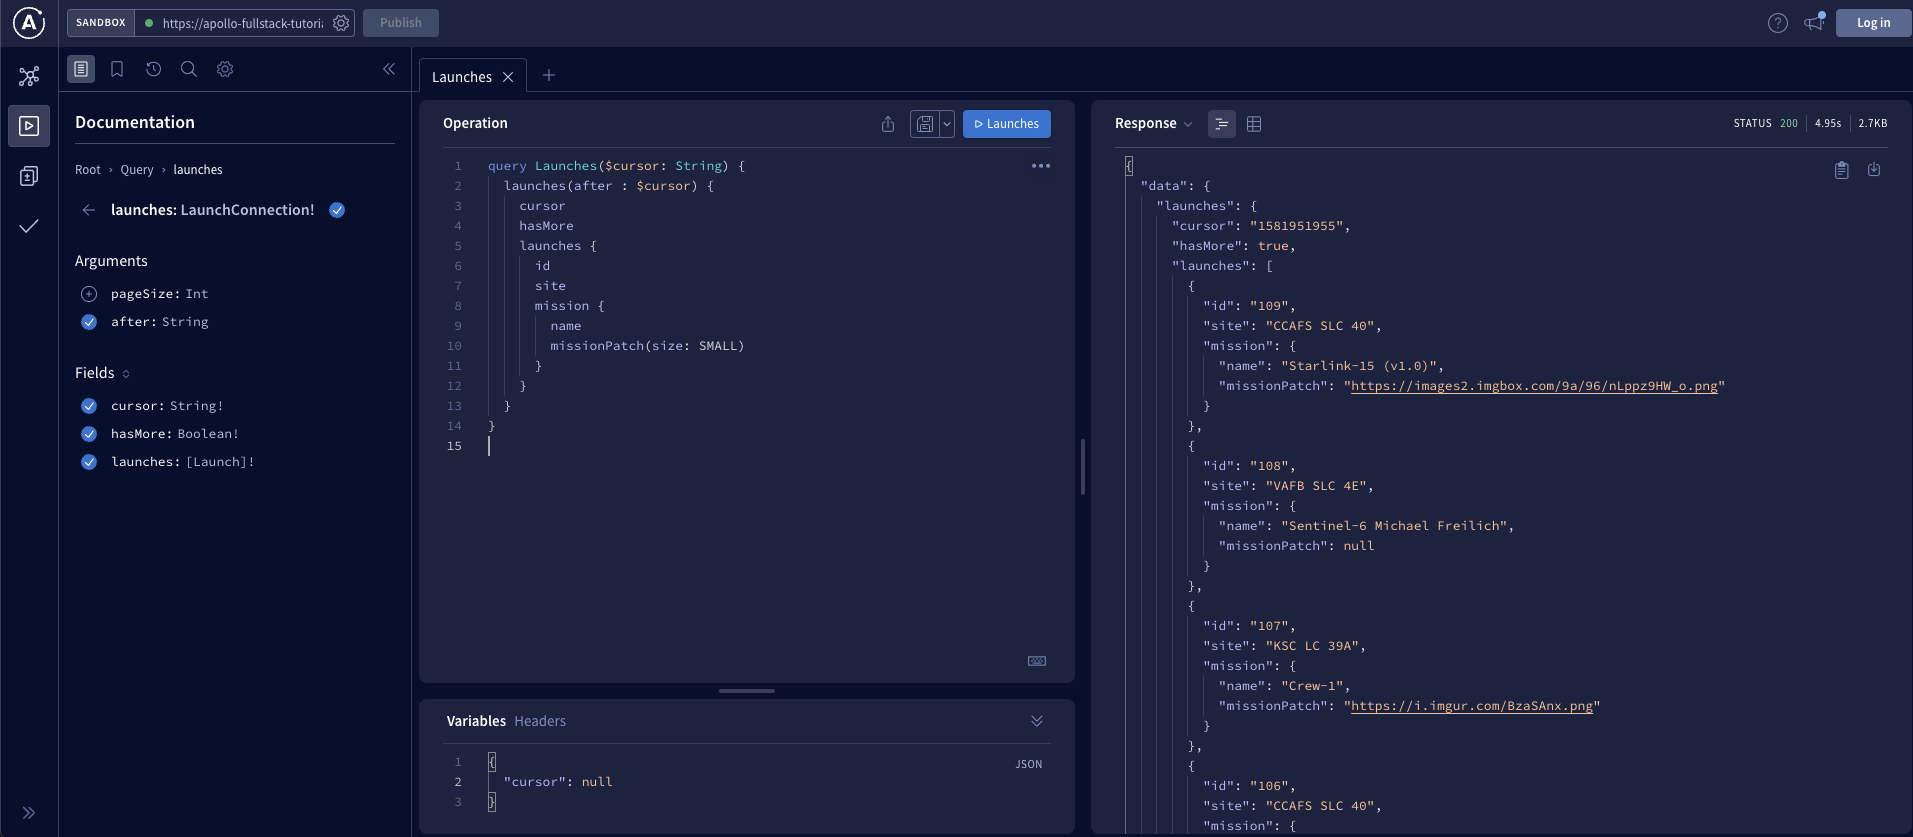
그러면 이제 작은 이미지 url이 들어온다. 그리고
변수로 들어가는 cursor 에 null로 호출하면 처음데이터를 호출한다. 첫리스폰스에 들어오는 cursor 값을 다음 호출때 넣어서 호출해주면 다음 데이터가 들어온다.
LaunchList UI 수정
리사이클러뷰 어댑터에서 리스트끝에 도달하면 콜백을 받아 다음 리스트를 서버로부터 받는 작업을 하겠다.
- LaunchListAdapter
class LaunchListAdapter(
    private val launches: List<LaunchListQuery.Launch>
) : RecyclerView.Adapter<LaunchListAdapter.ViewHolder>() {

    class ViewHolder(val binding: LaunchItemBinding) : RecyclerView.ViewHolder(binding.root)

    override fun onCreateViewHolder(parent: ViewGroup, viewType: Int): ViewHolder {
        val binding = LaunchItemBinding.inflate(LayoutInflater.from(parent.context),parent,false)
        return ViewHolder(binding)
    }

    override fun getItemCount(): Int {
        return launches.size
    }
    var onEndOfListReached: (() -> Unit)? = null

    override fun onBindViewHolder(holder: ViewHolder, position: Int) {
        val launch = launches[position]
        holder.binding.site.text = launch.site ?: ""
        holder.binding.missionName.text = launch.mission?.name
        Glide.with(holder.itemView.context).load(launch.mission?.missionPatch).into(holder.binding.missionPatch)

        if (position == launches.size - 1) {
            onEndOfListReached?.invoke()
        }
    }
}
onEndOfListReached 변수를 만들고 onBindViewHolder 안에서 리스트의 끝에 도달하면 해당 변수를 호출하도록 만든다.
- LaunchListFragment
class LaunchListFragment : Fragment() {
    private lateinit var binding: LaunchListFragmentBinding
    private val viewModel : MainViewModel by activityViewModels()

    private val launches = mutableListOf<LaunchListQuery.Launch>()
    private val adapter = LaunchListAdapter(launches)
    var cursor: String? = null
    private val channel = Channel<Unit>(Channel.CONFLATED)

    override fun onCreateView(
        inflater: LayoutInflater,
        container: ViewGroup?,
        savedInstanceState: Bundle?
    ): View? {
        binding = LaunchListFragmentBinding.inflate(inflater)
        return binding.root
    }

    override fun onViewCreated(view: View, savedInstanceState: Bundle?) {
        super.onViewCreated(view, savedInstanceState)
        viewModelObserver()
        binding.launches.adapter = adapter
        channel.trySend(Unit)
        adapter.onEndOfListReached = {
            channel.trySend(Unit)
        }
        viewModel.getLaunchListQuery(cursor)

        lifecycleScope.launchWhenResumed {
            for (item in channel) {
                binding.showProgress.visibility = View.VISIBLE
                viewModel.getLaunchListQuery(cursor)
            }
            adapter.onEndOfListReached = null
            channel.close()
        }
    }

    @SuppressLint("NotifyDataSetChanged")
    private fun viewModelObserver(){
        viewModel.launchListQueryData.observe(viewLifecycleOwner){ response ->
            binding.showProgress.visibility = View.GONE
            Log.e("response","${response.data}")
            val newLaunches = response.data?.launches?.launches?.filterNotNull()
            if (newLaunches != null && !response.hasErrors()){
                launches.addAll(newLaunches)
                adapter.notifyDataSetChanged()
            }
            cursor = response.data?.launches?.cursor
        }
    }
}
예제에서는 뷰모델이없고 뷰에서 바로 데이터를 호출하는데 여기서는 뷰모델을 만들어 아폴로 예제와 조금 다르다.
LaunchListFragment에 onEndOfListReached 콜백을 등록하고 코루틴 채널에 연결한다.
코루틴 채널은 코루틴간 통신에 유용하다. 여기에 사용된 채널은 리스트의 끝에 도달했다는 정보 외에 데이터를 전송하지 않기때문에 Unit를 사용한다.
그리고 CONFLATED 채널을 사용하는데 이전에 전송된 요소를 덮어써 항상 최신의 요소만 받는다.
viewModel.getLaunchListQuery(cursor) 첫 데이터는 cursor 가 널인상태로 호출하여 데이터를 받는다. 그후 cursor 변수에 받은데이터를 넣어둔다. 그후 리스트의 끝에 도달하면 콜백이 오게되고 데이터가들어간 cursor 를 호출하여 다음데이터를 받아온다. 모든 데이터에 끝에 도달하게되면 서버에서 response.data?.launches?.hasMore 데이터에 false를 준다.
실행시키면 다음과 같이 나온다.

상세 화면 추가
리스트가 정상적으로 표출되니이제 리스트를 클릭했을때 상세 화면으로 넘어가도록 만들어 보자
상세화면으로 이동및 데이터 전달
- LaunchListAdapter
어댑터에 클릭 리스너를 연결한다.
class LaunchListAdapter(
    private val launches: List<LaunchListQuery.Launch>
) : RecyclerView.Adapter<LaunchListAdapter.ViewHolder>() {

    class ViewHolder(val binding: LaunchItemBinding) : RecyclerView.ViewHolder(binding.root)

    override fun onCreateViewHolder(parent: ViewGroup, viewType: Int): ViewHolder {
        val binding = LaunchItemBinding.inflate(LayoutInflater.from(parent.context),parent,false)
        return ViewHolder(binding)
    }

    override fun getItemCount(): Int {
        return launches.size
    }
    var onEndOfListReached: (() -> Unit)? = null
    var onItemClicked: ((LaunchListQuery.Launch) -> Unit)? = null

    override fun onBindViewHolder(holder: ViewHolder, position: Int) {
        val launch = launches[position]
        holder.binding.site.text = launch.site ?: ""
        holder.binding.missionName.text = launch.mission?.name
        Glide.with(holder.itemView.context).load(launch.mission?.missionPatch).into(holder.binding.missionPatch)

        if (position == launches.size - 1) {
            onEndOfListReached?.invoke()
        }

        holder.binding.root.setOnClickListener {
            onItemClicked?.invoke(launch)
        }
    }
}
아까 만들었던 콜백과 똑같다. 하지만 이번엔 launch 데이터를 넣어서 같이 보내준다. 상세 데이터를 가져오는데 필요한 파라미터이다.
- LaunchListFragment
class LaunchListFragment : Fragment() {
    private lateinit var binding: LaunchListFragmentBinding
    private val viewModel : MainViewModel by activityViewModels()

    private val launches = mutableListOf<LaunchListQuery.Launch>()
    private val adapter = LaunchListAdapter(launches)
    var cursor: String? = null
    private val channel = Channel<Unit>(Channel.CONFLATED)

    override fun onCreateView(
        inflater: LayoutInflater,
        container: ViewGroup?,
        savedInstanceState: Bundle?
    ): View? {
        binding = LaunchListFragmentBinding.inflate(inflater)
        return binding.root
    }

    override fun onViewCreated(view: View, savedInstanceState: Bundle?) {
        super.onViewCreated(view, savedInstanceState)
        viewModelObserver()
        binding.launches.adapter = adapter
        channel.trySend(Unit)
        adapter.onEndOfListReached = {
            channel.trySend(Unit)
        }
        viewModel.getLaunchListQuery(cursor)

        lifecycleScope.launchWhenResumed {
            for (item in channel) {
                binding.showProgress.visibility = View.VISIBLE
                viewModel.getLaunchListQuery(cursor)
            }
            adapter.onEndOfListReached = null
            channel.close()
        }

        adapter.onItemClicked = { launch ->
            findNavController().navigate(
                LaunchListFragmentDirections.openLaunchDetails(launchId = launch.id)
            )
        }
    }

    @SuppressLint("NotifyDataSetChanged")
    private fun viewModelObserver(){
        viewModel.launchListQueryData.observe(viewLifecycleOwner){ response ->
            binding.showProgress.visibility = View.GONE
            Log.e("response","${response.data}")
            val newLaunches = response.data?.launches?.launches?.filterNotNull()
            if (newLaunches != null && !response.hasErrors()){
                launches.addAll(newLaunches)
                adapter.notifyDataSetChanged()
            }
            cursor = response.data?.launches?.cursor
        }
    }
}
        adapter.onItemClicked = { launch ->
            findNavController().navigate(
                LaunchListFragmentDirections.openLaunchDetails(launchId = launch.id)
            )
        }
를 추가해준다. 콜백은 이쪽으로 오고 네비게이션 컴포넌트를 통해 디테일프레그먼트를 호출하고 launchId도 같이 보내준다.
상세 쿼리 추가
launchId를 통해 데이터를 가져오기위한 쿼리를 추가해준다.
query LaunchDetails($id:ID!) {
    launch(id: $id) {
        id
        site
        mission {
            name
            missionPatch(size:LARGE)
        }
        rocket {
            name
            type
        }
        isBooked
    }
}
파라미터 뒤에 !가 붙으면 선택사항이아닌 필수라는 뜻이다.
그리고 이미지는 상세화면이기에 size:LARGE로 고정했다.
뷰모델 추가
class MainViewModel : ViewModel() {
    var launchListQueryData = MutableLiveData<ApolloResponse<LaunchListQuery.Data>>()
    var launchDetailQueryData = MutableLiveData<ApolloResponse<LaunchDetailsQuery.Data>>()

    var errorLiveData = MutableLiveData<ApolloException>()

    fun getLaunchListQuery(cursor:String?) = GlobalScope.launch{
        try {
            launchListQueryData.postValue(Apollo.apolloClient().query(LaunchListQuery(Optional.Present(cursor))).execute())
        }catch (e: ApolloException){
            errorLiveData.postValue(e)
            Log.e("LaunchList", "Failure", e)
            return@launch
        }
    }

    fun getLaunchDetailQuery(id:String) = GlobalScope.launch{
        try {
            launchDetailQueryData.postValue(Apollo.apolloClient().query(LaunchDetailsQuery(id)).execute())
        }catch (e: ApolloException){
            errorLiveData.postValue(e)
            Log.e("LaunchDetail", "Failure", e)
            return@launch
        }
    }
}
추가한 쿼리를 사용해 데이터를 가져올 수 있도록 뷰모델에 호출함수를 만들어준다.
네비게이션 컴포넌트 설정
- navigation main.xml
<?xml version="1.0" encoding="utf-8"?>
<navigation xmlns:android="http://schemas.android.com/apk/res/android"
    xmlns:app="http://schemas.android.com/apk/res-auto"
    xmlns:tools="http://schemas.android.com/tools"
    android:id="@+id/nav"
    app:startDestination="@id/launchListFragment">
    <fragment
        android:id="@+id/launchListFragment"
        android:name="com.cellodove.apollo_example.view.LaunchListFragment"
        tools:layout="@layout/launch_list_fragment">
        <action
            android:id="@+id/openLaunchDetails"
            app:destination="@+id/launch_details_fragment"/>
    </fragment>

    <fragment
        android:id="@+id/launch_details_fragment"
        android:name="com.cellodove.apollo_example.view.LaunchDetailsFragment"
        tools:layout="@layout/launch_details_fragment">
        <argument
            android:name="launchId"
            app:argType="string"/>

        <action
            android:id="@+id/open_login"
            app:destination="@id/login_fragment" />
    </fragment>

    <fragment
        android:id="@+id/login_fragment"
        android:name="com.cellodove.apollo_example.view.LoginFragment"
        tools:layout="@layout/login_fragment" />
</navigation>
여기서는 프래그먼트간의 이동과 보낼 데이터등을 설정할 수있다.
<action
    android:id="@+id/openLaunchDetails"
    app:destination="@+id/launch_details_fragment"/>
이동할 프레그먼트와 해당프레그먼트의 아이디를 설정할수있다. 호출할때는 아이디로 호출한다.
findNavController().navigate(
    LaunchListFragmentDirections.openLaunchDetails(launchId = launch.id)
)
<argument
    android:name="launchId"
    app:argType="string"/>
여기서 받을 데이터의 이름과 형식을 설정할 수 있다.
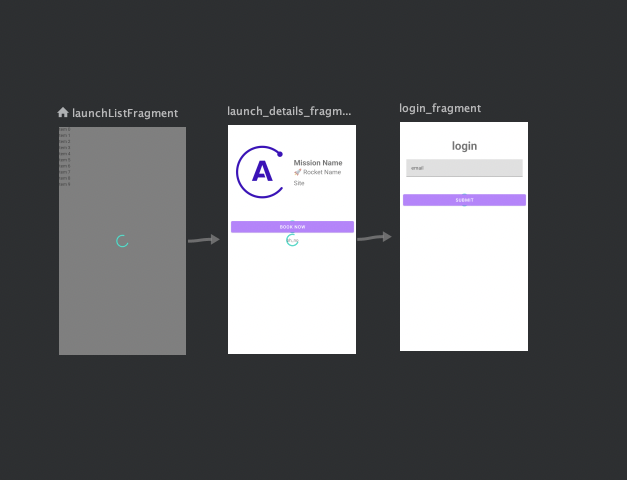
이렇게 흐름도를 보여준다.
상세화면
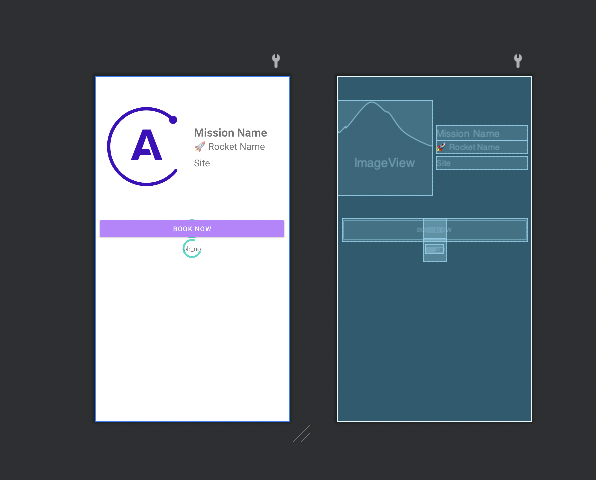
상세화면을 만들어 준다.
- launch_detail_fragment
<?xml version="1.0" encoding="utf-8"?>
<androidx.constraintlayout.widget.ConstraintLayout
    xmlns:android="http://schemas.android.com/apk/res/android"
    android:layout_width="match_parent"
    android:layout_height="match_parent"
    xmlns:tools="http://schemas.android.com/tools"
    xmlns:app="http://schemas.android.com/apk/res-auto">

    <ImageView
        android:layout_width="200dp"
        android:layout_height="200dp"
        android:layout_marginTop="50dp"
        android:id="@+id/missionPatch"
        android:padding="16dp"
        tools:src="@drawable/ic_placeholder"
        app:layout_constraintStart_toStartOf="parent"
        app:layout_constraintTop_toTopOf="parent"
    />
    <TextView
        android:id="@+id/mission_name"
        android:layout_width="0dp"
        android:layout_height="wrap_content"
        app:layout_constraintStart_toEndOf="@+id/missionPatch"
        app:layout_constraintEnd_toEndOf="parent"
        app:layout_constraintTop_toTopOf="@+id/missionPatch"
        app:layout_constraintBottom_toTopOf="@+id/rocket_name"
        app:layout_constraintVertical_chainStyle="packed"
        tools:text="Mission Name"
        android:layout_marginEnd="10dp"
        android:layout_marginStart="10dp"
        android:textSize="24sp"
        android:textStyle="bold">
    </TextView>
    <TextView
        android:id="@+id/rocket_name"
        android:layout_width="0dp"
        android:layout_height="wrap_content"
        app:layout_constraintStart_toEndOf="@+id/missionPatch"
        app:layout_constraintEnd_toEndOf="parent"
        app:layout_constraintTop_toBottomOf="@+id/mission_name"
        app:layout_constraintBottom_toTopOf="@+id/site"
        app:layout_constraintVertical_chainStyle="packed"
        tools:text="🚀 Rocket Name"
        android:layout_marginEnd="10dp"
        android:layout_marginStart="10dp"
        android:textSize="20sp">
    </TextView>
    <TextView
        android:id="@+id/site"
        android:layout_width="0dp"
        android:layout_height="wrap_content"
        app:layout_constraintLeft_toRightOf="@+id/missionPatch"
        app:layout_constraintRight_toRightOf="parent"
        app:layout_constraintTop_toBottomOf="@+id/rocket_name"
        app:layout_constraintBottom_toBottomOf="@+id/missionPatch"
        tools:text="Site"
        android:layout_marginTop="8dp"
        android:layout_marginEnd="10dp"
        android:layout_marginStart="10dp"
        android:textSize="20sp">
    </TextView>

    <Button
        android:id="@+id/book_button"
        android:layout_width="0dp" android:layout_height="wrap_content"
        android:backgroundTint="@color/purple_200"
        app:layout_constraintTop_toBottomOf="@id/missionPatch"
        app:layout_constraintStart_toStartOf="parent"
        app:layout_constraintEnd_toEndOf="parent"
        tools:text="book now"
        android:textColor="@android:color/white"
        android:layout_marginTop="50dp"
        android:layout_marginStart="10dp"
        android:layout_marginEnd="10dp"/>
    <ProgressBar android:layout_width="wrap_content" android:layout_height="wrap_content"
                 android:id="@+id/book_progress_bar"
                 app:layout_constraintStart_toStartOf="@+id/book_button"
                 app:layout_constraintEnd_toEndOf="@+id/book_button"
                 app:layout_constraintTop_toTopOf="@+id/book_button"
                 app:layout_constraintBottom_toBottomOf="@+id/book_button"/>

    <ProgressBar android:layout_width="wrap_content" android:layout_height="wrap_content"
                 android:id="@+id/progress_bar"
                 app:layout_constraintStart_toStartOf="parent"
                 app:layout_constraintEnd_toEndOf="parent"
                 app:layout_constraintTop_toTopOf="parent"
                 app:layout_constraintBottom_toBottomOf="parent"/>

    <TextView android:layout_width="wrap_content" android:layout_height="wrap_content"
              android:id="@+id/error"
              android:text="oh_no"
              app:layout_constraintStart_toStartOf="parent"
              app:layout_constraintEnd_toEndOf="parent"
              app:layout_constraintTop_toTopOf="parent"
              app:layout_constraintBottom_toBottomOf="parent"/>

</androidx.constraintlayout.widget.ConstraintLayout>
- LaunchDetailsFragment
class LaunchDetailsFragment : Fragment() {
    private lateinit var binding: LaunchDetailsFragmentBinding
    private val viewModel : MainViewModel by activityViewModels()
    val args: LaunchDetailsFragmentArgs by navArgs()

    override fun onCreateView(
        inflater: LayoutInflater,
        container: ViewGroup?,
        savedInstanceState: Bundle?
    ): View? {
        binding = LaunchDetailsFragmentBinding.inflate(inflater)
        return binding.root
    }

    override fun onViewCreated(view: View, savedInstanceState: Bundle?) {
        super.onViewCreated(view, savedInstanceState)
        viewModelObserver()

        lifecycleScope.launchWhenResumed {
            binding.bookButton.visibility = View.GONE
            binding.bookProgressBar.visibility = View.GONE
            binding.progressBar.visibility = View.VISIBLE
            binding.error.visibility = View.GONE

            viewModel.getLaunchDetailQuery(args.launchId)
        }
    }

    private fun viewModelObserver(){
        viewModel.launchDetailQueryData.observe(viewLifecycleOwner){ response ->
            binding.progressBar.visibility = View.GONE
            if (response.data?.launch == null || response.hasErrors()){
                binding.error.text = response.errors?.get(0)?.message
                binding.error.visibility = View.VISIBLE
            }else{
                Glide.with(requireContext()).load(response.data!!.launch?.mission?.missionPatch).into(binding.missionPatch)
                binding.site.text = response.data!!.launch?.site
                binding.missionName.text = response.data!!.launch?.mission?.name
                val rocket = response.data!!.launch?.rocket
                binding.rocketName.text = "🚀 ${rocket?.name} ${rocket?.type}"
                configureButton(response.data!!.launch!!.isBooked)
            }
        }
        viewModel.errorLiveData.observe(viewLifecycleOwner){ e ->
            binding.progressBar.visibility = View.GONE
            binding.error.text = "Oh no... A protocol error happened"
            binding.error.visibility = View.VISIBLE
        }
    }
    private fun configureButton(isBooked: Boolean) {
        binding.bookButton.visibility = View.VISIBLE
        binding.bookProgressBar.visibility = View.GONE

        binding.bookButton.text = if (isBooked) {
            "Cancel"
        } else {
            "Book Now"
        }

        binding.bookButton.setOnClickListener {
            if (User.getToken(requireContext()) == null) {
                findNavController().navigate(
                    R.id.open_login
                )
                return@setOnClickListener
            }
        }
    }
}
아까 리스트화면에서 디테일 화면으로 런치 아이디를 보냈다. 보낸데이터는
val args: LaunchDetailsFragmentArgs by navArgs()
args.launchId
형태로 받아서 사용할 수 있다.
프래그먼트가 생성되면 받은 데이터를 이용해 바로 상세 데이터를 호출한다.
그리고 프로토콜이나 어플리케이션 오류가 생기면 화면에 에러메시지를 표출해준다.
이상이없으면 형식에 맞춰 데이터를 표출해준다.
예약 버튼 처리
북마크 버튼을 눌렀을때 유저 토큰이 없으면 로그인 화면으로 넘어가는 메서드를 추가한다.
private fun configureButton(isBooked: Boolean) {
    binding.bookButton.visibility = View.VISIBLE
    binding.bookProgressBar.visibility = View.GONE

    binding.bookButton.text = if (isBooked) {
        "Cancel"
     else {
            "Book Now"
    }

    binding.bookButton.setOnClickListener {
        if (User.getToken(requireContext()) == null) {
            findNavController().navigate(
                R.id.open_login
            )
            return@setOnClickListener
        }
    }
}
- User
object User {
    private const val KEY_TOKEN = "TOKEN"
    private fun preferences(context: Context): SharedPreferences {
        val masterKeyAlias: String = MasterKeys.getOrCreate(MasterKeys.AES256_GCM_SPEC)

        val sharedPreferences: SharedPreferences = EncryptedSharedPreferences.create(
            "secret_shared_prefs",
            masterKeyAlias,
            context,
            EncryptedSharedPreferences.PrefKeyEncryptionScheme.AES256_SIV,
            EncryptedSharedPreferences.PrefValueEncryptionScheme.AES256_GCM
        )
        return sharedPreferences
    }

    fun getToken(context: Context): String? {
        return preferences(context).getString(KEY_TOKEN, null)
    }

    fun setToken(context: Context, token: String) {
        preferences(context).edit().apply {
            putString(KEY_TOKEN, token)
            apply()
        }
    }

    fun removeToken(context: Context) {
        preferences(context).edit().apply {
            remove(KEY_TOKEN)
            apply()
        }
    }
}
키를 생성, 제거, 저장, 호출 할 수 있는 EncryptedSharedPreference 에 토큰을 저장하는 클래스다.
로그인하거나 토큰을 생성한적이없기에 무조건 로그인 화면으로 넘어가게된다.
로그인 화면
먼저 네비게이션에 로그인 화면을 연결해준다.
<navigation xmlns:android="http://schemas.android.com/apk/res/android"
    xmlns:app="http://schemas.android.com/apk/res-auto"
    xmlns:tools="http://schemas.android.com/tools"
    android:id="@+id/nav"
    app:startDestination="@id/launchListFragment">
    <fragment
        android:id="@+id/launchListFragment"
        android:name="com.cellodove.apollo_example.view.LaunchListFragment"
        tools:layout="@layout/launch_list_fragment">
        <action
            android:id="@+id/openLaunchDetails"
            app:destination="@+id/launch_details_fragment"/>
    </fragment>

    <fragment
        android:id="@+id/launch_details_fragment"
        android:name="com.cellodove.apollo_example.view.LaunchDetailsFragment"
        tools:layout="@layout/launch_details_fragment">
        <argument
            android:name="launchId"
            app:argType="string"/>

        <action
            android:id="@+id/open_login"
            app:destination="@id/login_fragment" />
    </fragment>

    <fragment
        android:id="@+id/login_fragment"
        android:name="com.cellodove.apollo_example.view.LoginFragment"
        tools:layout="@layout/login_fragment" />
</navigation>
<action
    android:id="@+id/open_login"
    app:destination="@id/login_fragment" />
액션을 통해 넘어갈 화면을 설정한다.
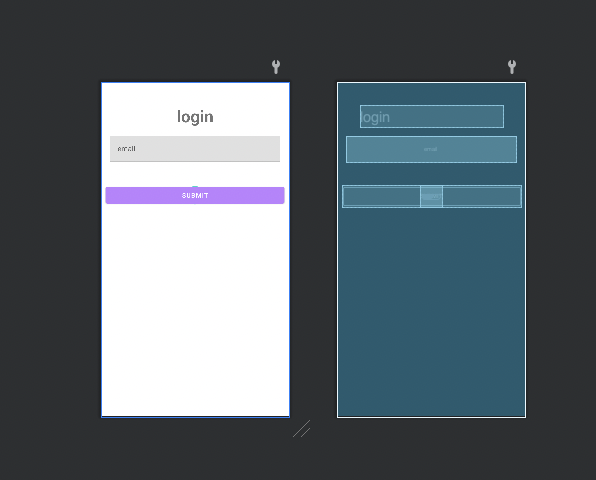
- login_fragment.xml
<?xml version="1.0" encoding="utf-8"?>
<androidx.constraintlayout.widget.ConstraintLayout
    xmlns:android="http://schemas.android.com/apk/res/android"
    android:layout_width="match_parent"
    android:layout_height="match_parent"
    xmlns:app="http://schemas.android.com/apk/res-auto"
    xmlns:tools="http://schemas.android.com/tools">

    <TextView
        android:layout_width="0dp"
        android:layout_height="wrap_content"
        android:text="login"
        android:layout_margin="50dp"
        app:layout_constraintStart_toStartOf="parent"
        app:layout_constraintEnd_toEndOf="parent"
        app:layout_constraintTop_toTopOf="parent"
        android:gravity="center"
        android:textStyle="bold"
        android:id="@+id/login"
        android:textSize="36sp"/>

    <com.google.android.material.textfield.TextInputLayout
        android:layout_width="0dp"
        android:id="@+id/email_layout"
        android:layout_height="wrap_content"
        app:layout_constraintTop_toBottomOf="@+id/login"
        app:layout_constraintStart_toStartOf="parent"
        app:layout_constraintEnd_toEndOf="parent"
        android:layout_margin="20dp"
        android:hint="email"
        tools:text="test@test.com">

        <com.google.android.material.textfield.TextInputEditText
            android:id="@+id/email"
            android:layout_width="match_parent"
            android:layout_height="wrap_content"/>
    </com.google.android.material.textfield.TextInputLayout>

    <Button
        android:id="@+id/submit"
        android:layout_width="0dp"
        android:layout_height="wrap_content"
        android:backgroundTint="@color/purple_200"
        app:layout_constraintTop_toBottomOf="@id/email_layout"
        app:layout_constraintStart_toStartOf="parent"
        app:layout_constraintEnd_toEndOf="parent"
        android:text="submit"
        android:textColor="@android:color/white"
        android:layout_marginTop="50dp"
        android:layout_marginStart="10dp"
        android:layout_marginEnd="10dp"/>
    <ProgressBar
        android:layout_width="wrap_content"
        android:layout_height="wrap_content"
        android:id="@+id/submit_progress_bar"
        app:layout_constraintStart_toStartOf="@+id/submit"
        app:layout_constraintEnd_toEndOf="@+id/submit"
        app:layout_constraintTop_toTopOf="@+id/submit"
        app:layout_constraintBottom_toBottomOf="@+id/submit"/>
</androidx.constraintlayout.widget.ConstraintLayout>
- LoginFragment
class LoginFragment : Fragment() {
    private lateinit var binding: LoginFragmentBinding

    override fun onCreateView(
        inflater: LayoutInflater,
        container: ViewGroup?,
        savedInstanceState: Bundle?
    ): View {
        binding = LoginFragmentBinding.inflate(inflater, container, false)
        return binding.root
    }

    override fun onViewCreated(view: View, savedInstanceState: Bundle?) {
        super.onViewCreated(view, savedInstanceState)

        binding.submitProgressBar.visibility = View.GONE
        binding.submit.setOnClickListener {
            val email = binding.email.text.toString()
            if (!Patterns.EMAIL_ADDRESS.matcher(email).matches()) {
                binding.emailLayout.error = "Invalid email"
                return@setOnClickListener
            }
            binding.submitProgressBar.visibility = View.VISIBLE
            binding.submit.visibility = View.GONE
        }
    }
}
이렇게 하면 상세화면에서 로그인까지연결이 끝난다.
실행시키면 다음과 같이 나온다.
전체 코드는 아래 링크에서 볼 수 있다.
https://github.com/cellodove/Apollo_Example2
다음글 보기
[Android] Apollo를 이용해 Graph QL API 통신3
참조
https://www.apollographql.com/docs/kotlin/tutorial/07-paginate-results
https://play.kotlinlang.org/hands-on/Introduction to Coroutines and Channels/08_Channels